> ## Documentation Index
> Fetch the complete documentation index at: https://parser.xdr.ooo/llms.txt
> Use this file to discover all available pages before exploring further.
# Quickstart | Paste logs and create a parser
> A click-by-click walkthrough for somebody who has never used a log parser.
# Your first parser in five steps
**You have copied logs from a product. You do not know the log format. That is enough to start.**
**Goal:** Analyze two fictional events, review the extracted values, check their field names, and reach the parser file download step.
## Step 1 — Open Auto Parser
Open Parser Studio and choose **Auto Parser** in the left menu. You should see these four stages at the top: **Add Logs**, **Review Fields**, **Map Fields**, and **Create Parser**.
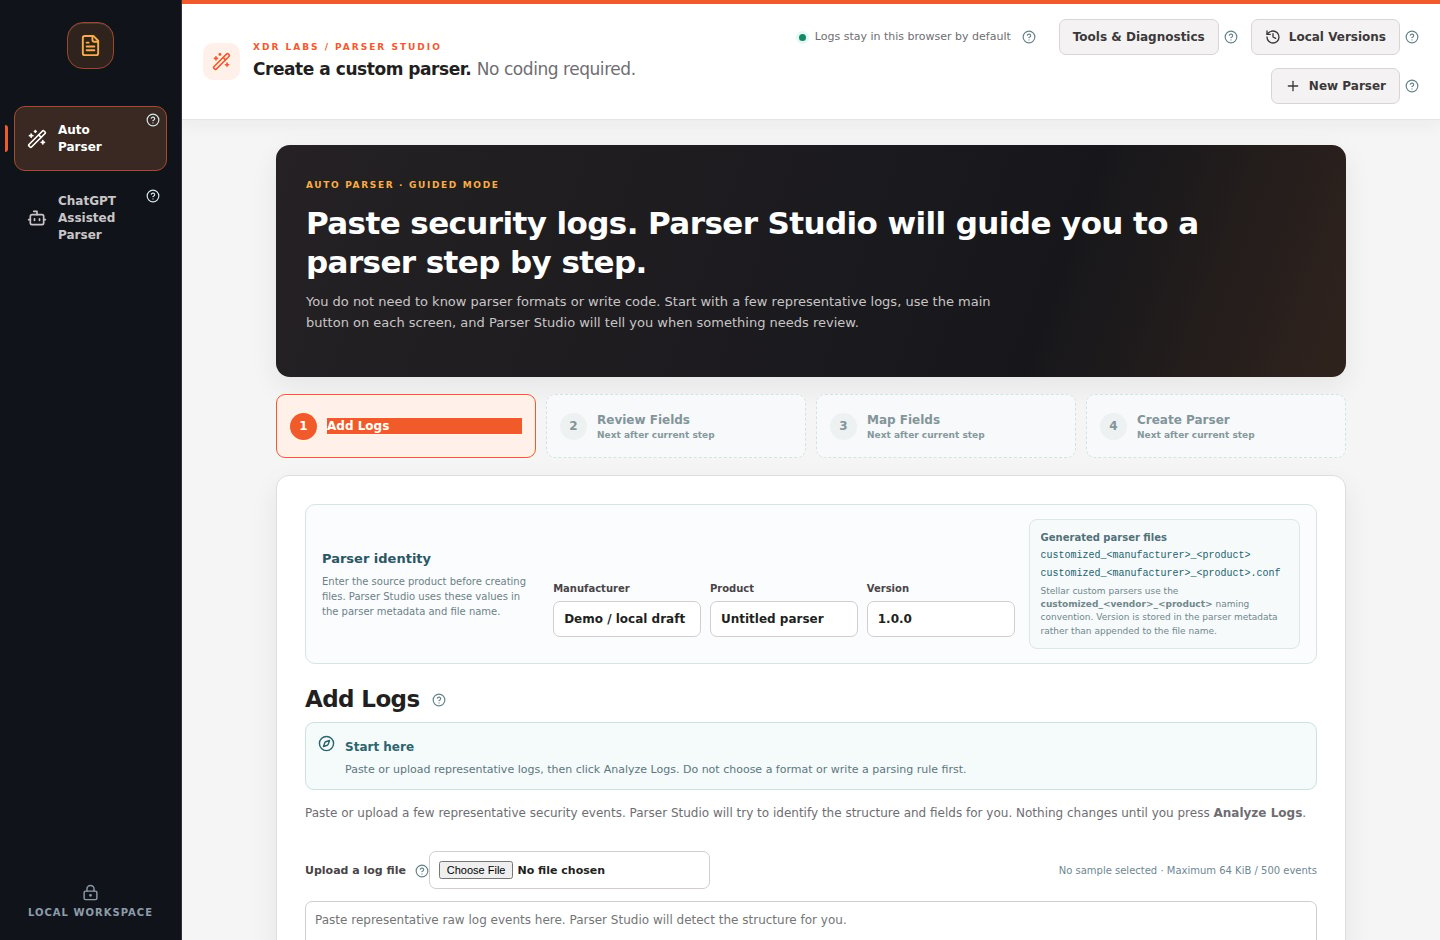 *Start in Auto Parser. Leave Tools & Diagnostics closed until the application asks you to investigate a problem.*
The **Manufacturer**, **Product**, and optional **Version** boxes identify the parser you are creating. You can start analyzing first; enter the source product identity before generating files.
## Step 2 — Paste the logs and analyze
Paste these two fictional events into the large box under **Add Logs**:
```json theme={null}
{"timestamp":"2026-10-18T09:00:00Z","action":"allow","src_ip":"192.0.2.10","dst_ip":"198.51.100.20","dst_port":443,"user":"demo-user"}
{"timestamp":"2026-10-18T09:00:01Z","action":"deny","src_ip":"192.0.2.11","dst_ip":"203.0.113.5","dst_port":22,"user":"demo-admin"}
```
Click the orange **Analyze Logs** button. **Do not select JSON, CEF, LEEF, or a regular expression.** Parser Studio will inspect the records.
If you see **2 of 2 log events parsed completely**, click **Review Fields**. If the count is incomplete, follow [what to do with a warning](/scenarios/unknown-log) first.
*Start in Auto Parser. Leave Tools & Diagnostics closed until the application asks you to investigate a problem.*
The **Manufacturer**, **Product**, and optional **Version** boxes identify the parser you are creating. You can start analyzing first; enter the source product identity before generating files.
## Step 2 — Paste the logs and analyze
Paste these two fictional events into the large box under **Add Logs**:
```json theme={null}
{"timestamp":"2026-10-18T09:00:00Z","action":"allow","src_ip":"192.0.2.10","dst_ip":"198.51.100.20","dst_port":443,"user":"demo-user"}
{"timestamp":"2026-10-18T09:00:01Z","action":"deny","src_ip":"192.0.2.11","dst_ip":"203.0.113.5","dst_port":22,"user":"demo-admin"}
```
Click the orange **Analyze Logs** button. **Do not select JSON, CEF, LEEF, or a regular expression.** Parser Studio will inspect the records.
If you see **2 of 2 log events parsed completely**, click **Review Fields**. If the count is incomplete, follow [what to do with a warning](/scenarios/unknown-log) first.
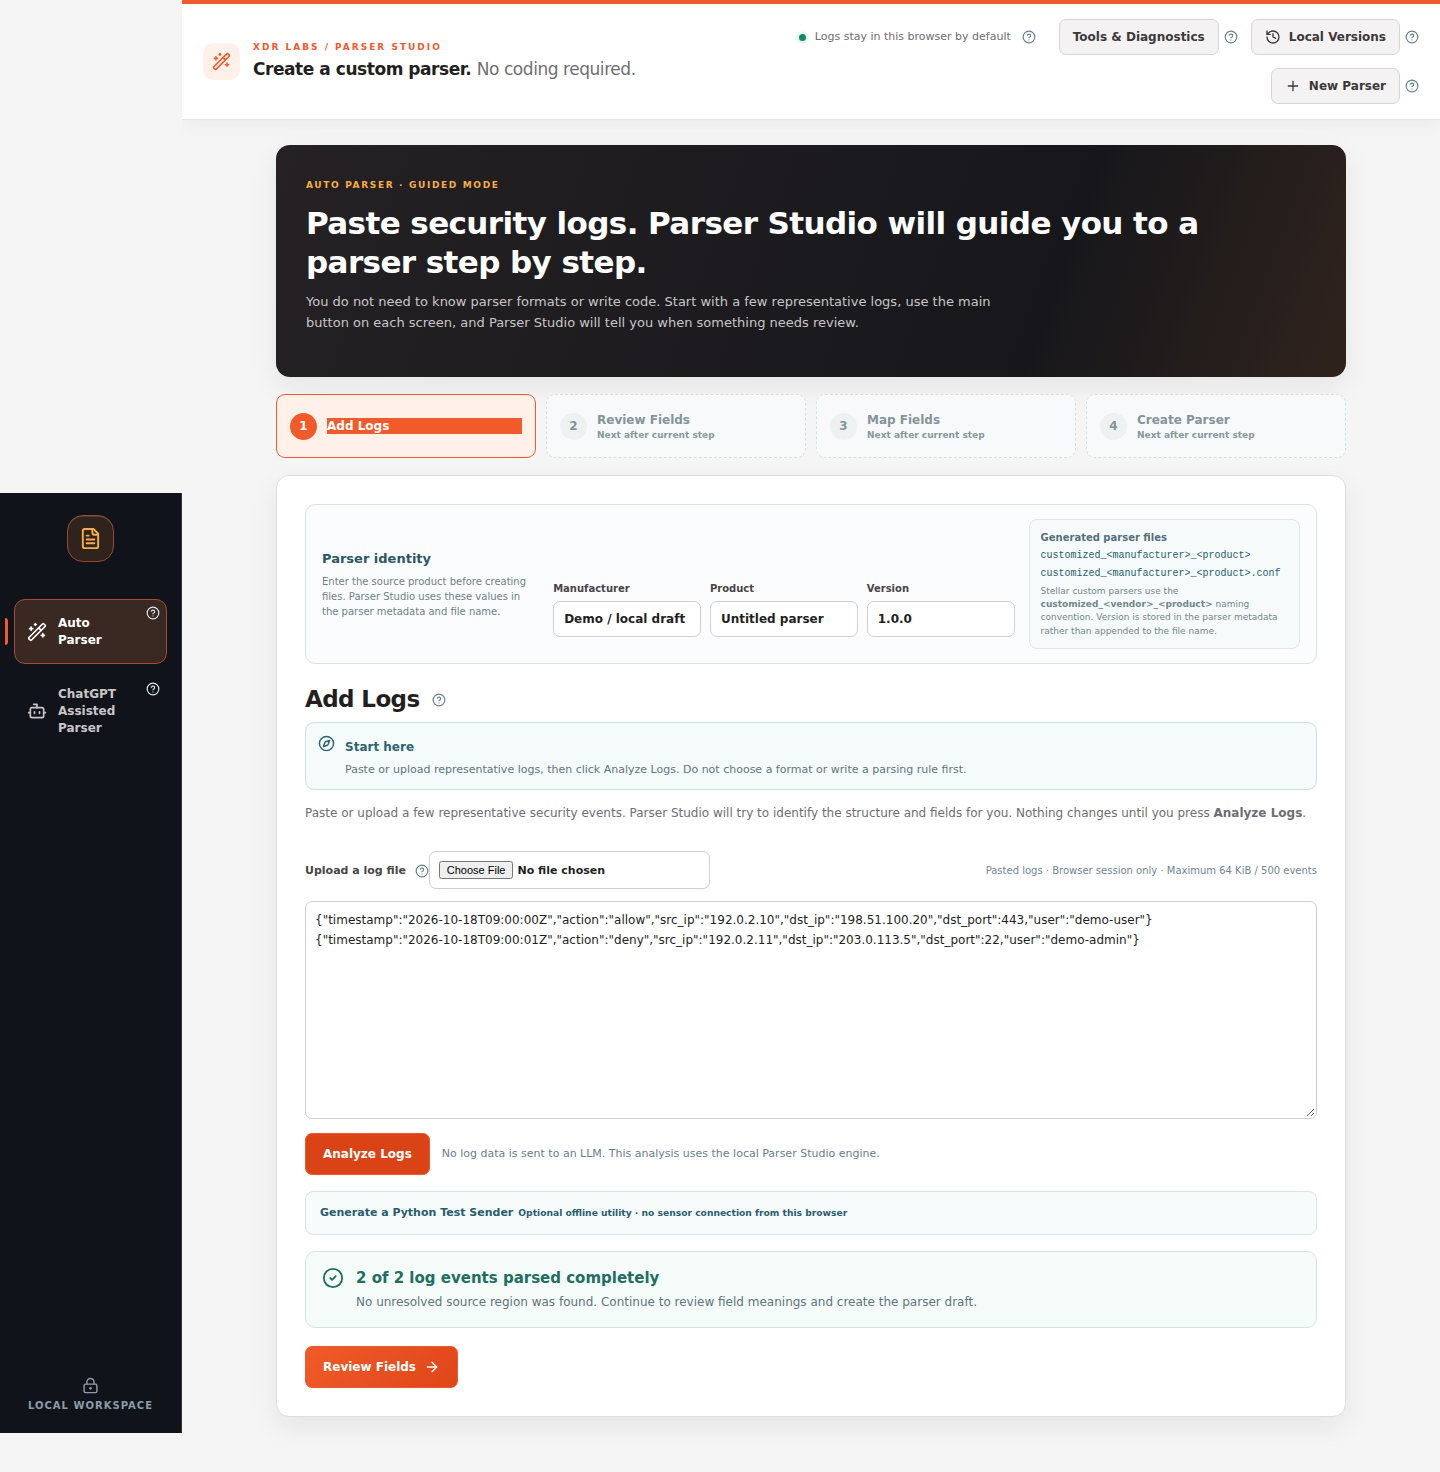 *Notice the green result and the orange Review Fields button below it.*
## Step 3 — Check the values, then click Map Fields
In **Review Fields**, use **Choose a source event** to examine both events.
Check the three areas: **Original log**, **Fields Parser Studio found**, and **Current output preview**. For example, the source address `192.0.2.10` should remain the source address in the parsed result.
If the extraction is correct, click **Map Fields** at the bottom. You do not need to repair a passing event.
*Notice the green result and the orange Review Fields button below it.*
## Step 3 — Check the values, then click Map Fields
In **Review Fields**, use **Choose a source event** to examine both events.
Check the three areas: **Original log**, **Fields Parser Studio found**, and **Current output preview**. For example, the source address `192.0.2.10` should remain the source address in the parsed result.
If the extraction is correct, click **Map Fields** at the bottom. You do not need to repair a passing event.
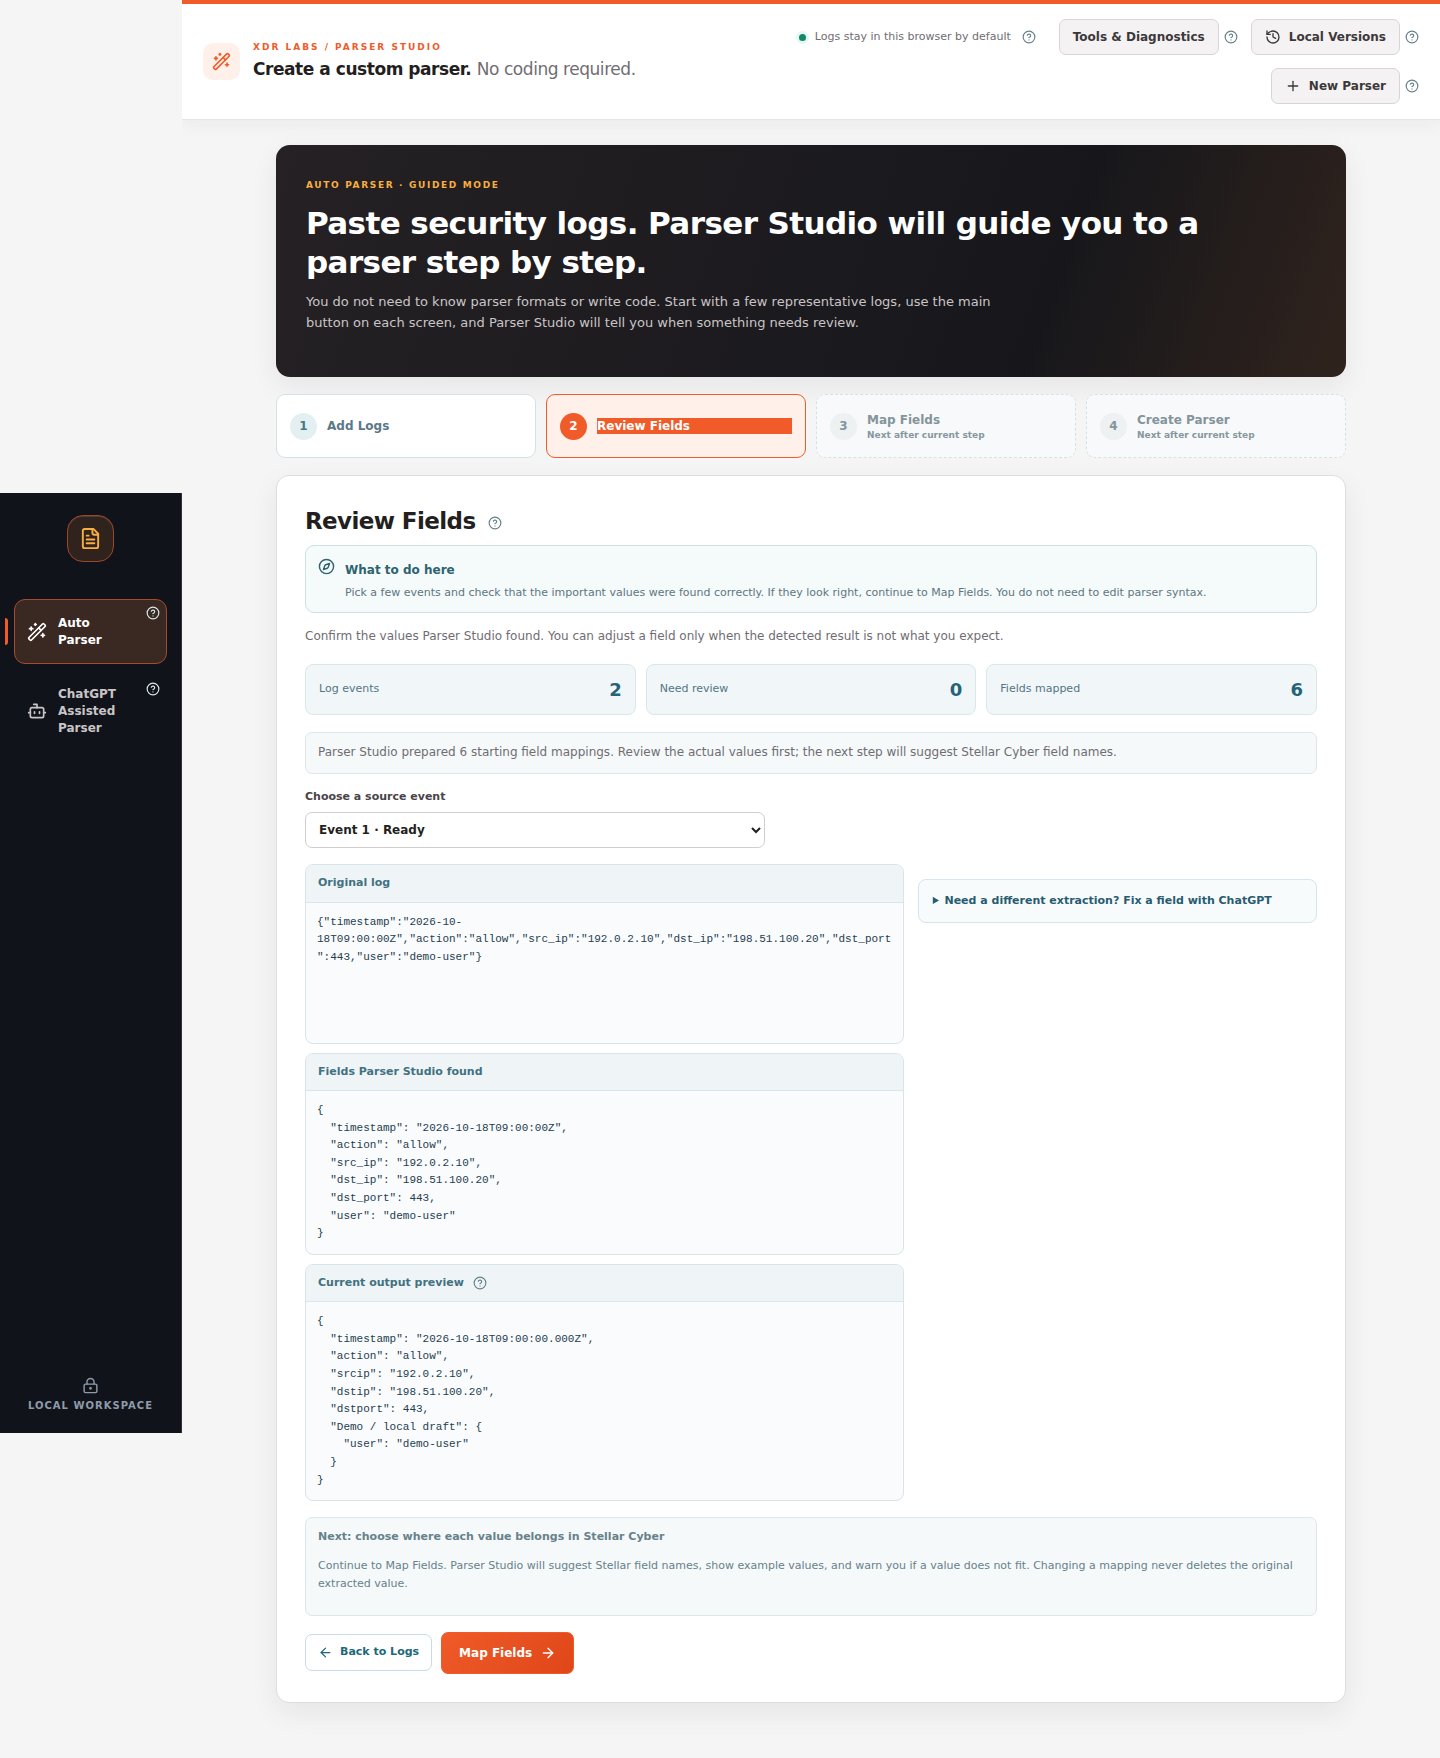 *Compare original text with the extracted value, not only the status badge.*
## Step 4 — Review suggested field names
On **Map Fields**, confirm that the address, action, port, and timestamp go to the intended output names. Most of the example fields are already matched.
Check **Must fix before continuing**. If it shows **0** and the sample values make sense, click **Create Parser**.
*Compare original text with the extracted value, not only the status badge.*
## Step 4 — Review suggested field names
On **Map Fields**, confirm that the address, action, port, and timestamp go to the intended output names. Most of the example fields are already matched.
Check **Must fix before continuing**. If it shows **0** and the sample values make sense, click **Create Parser**.
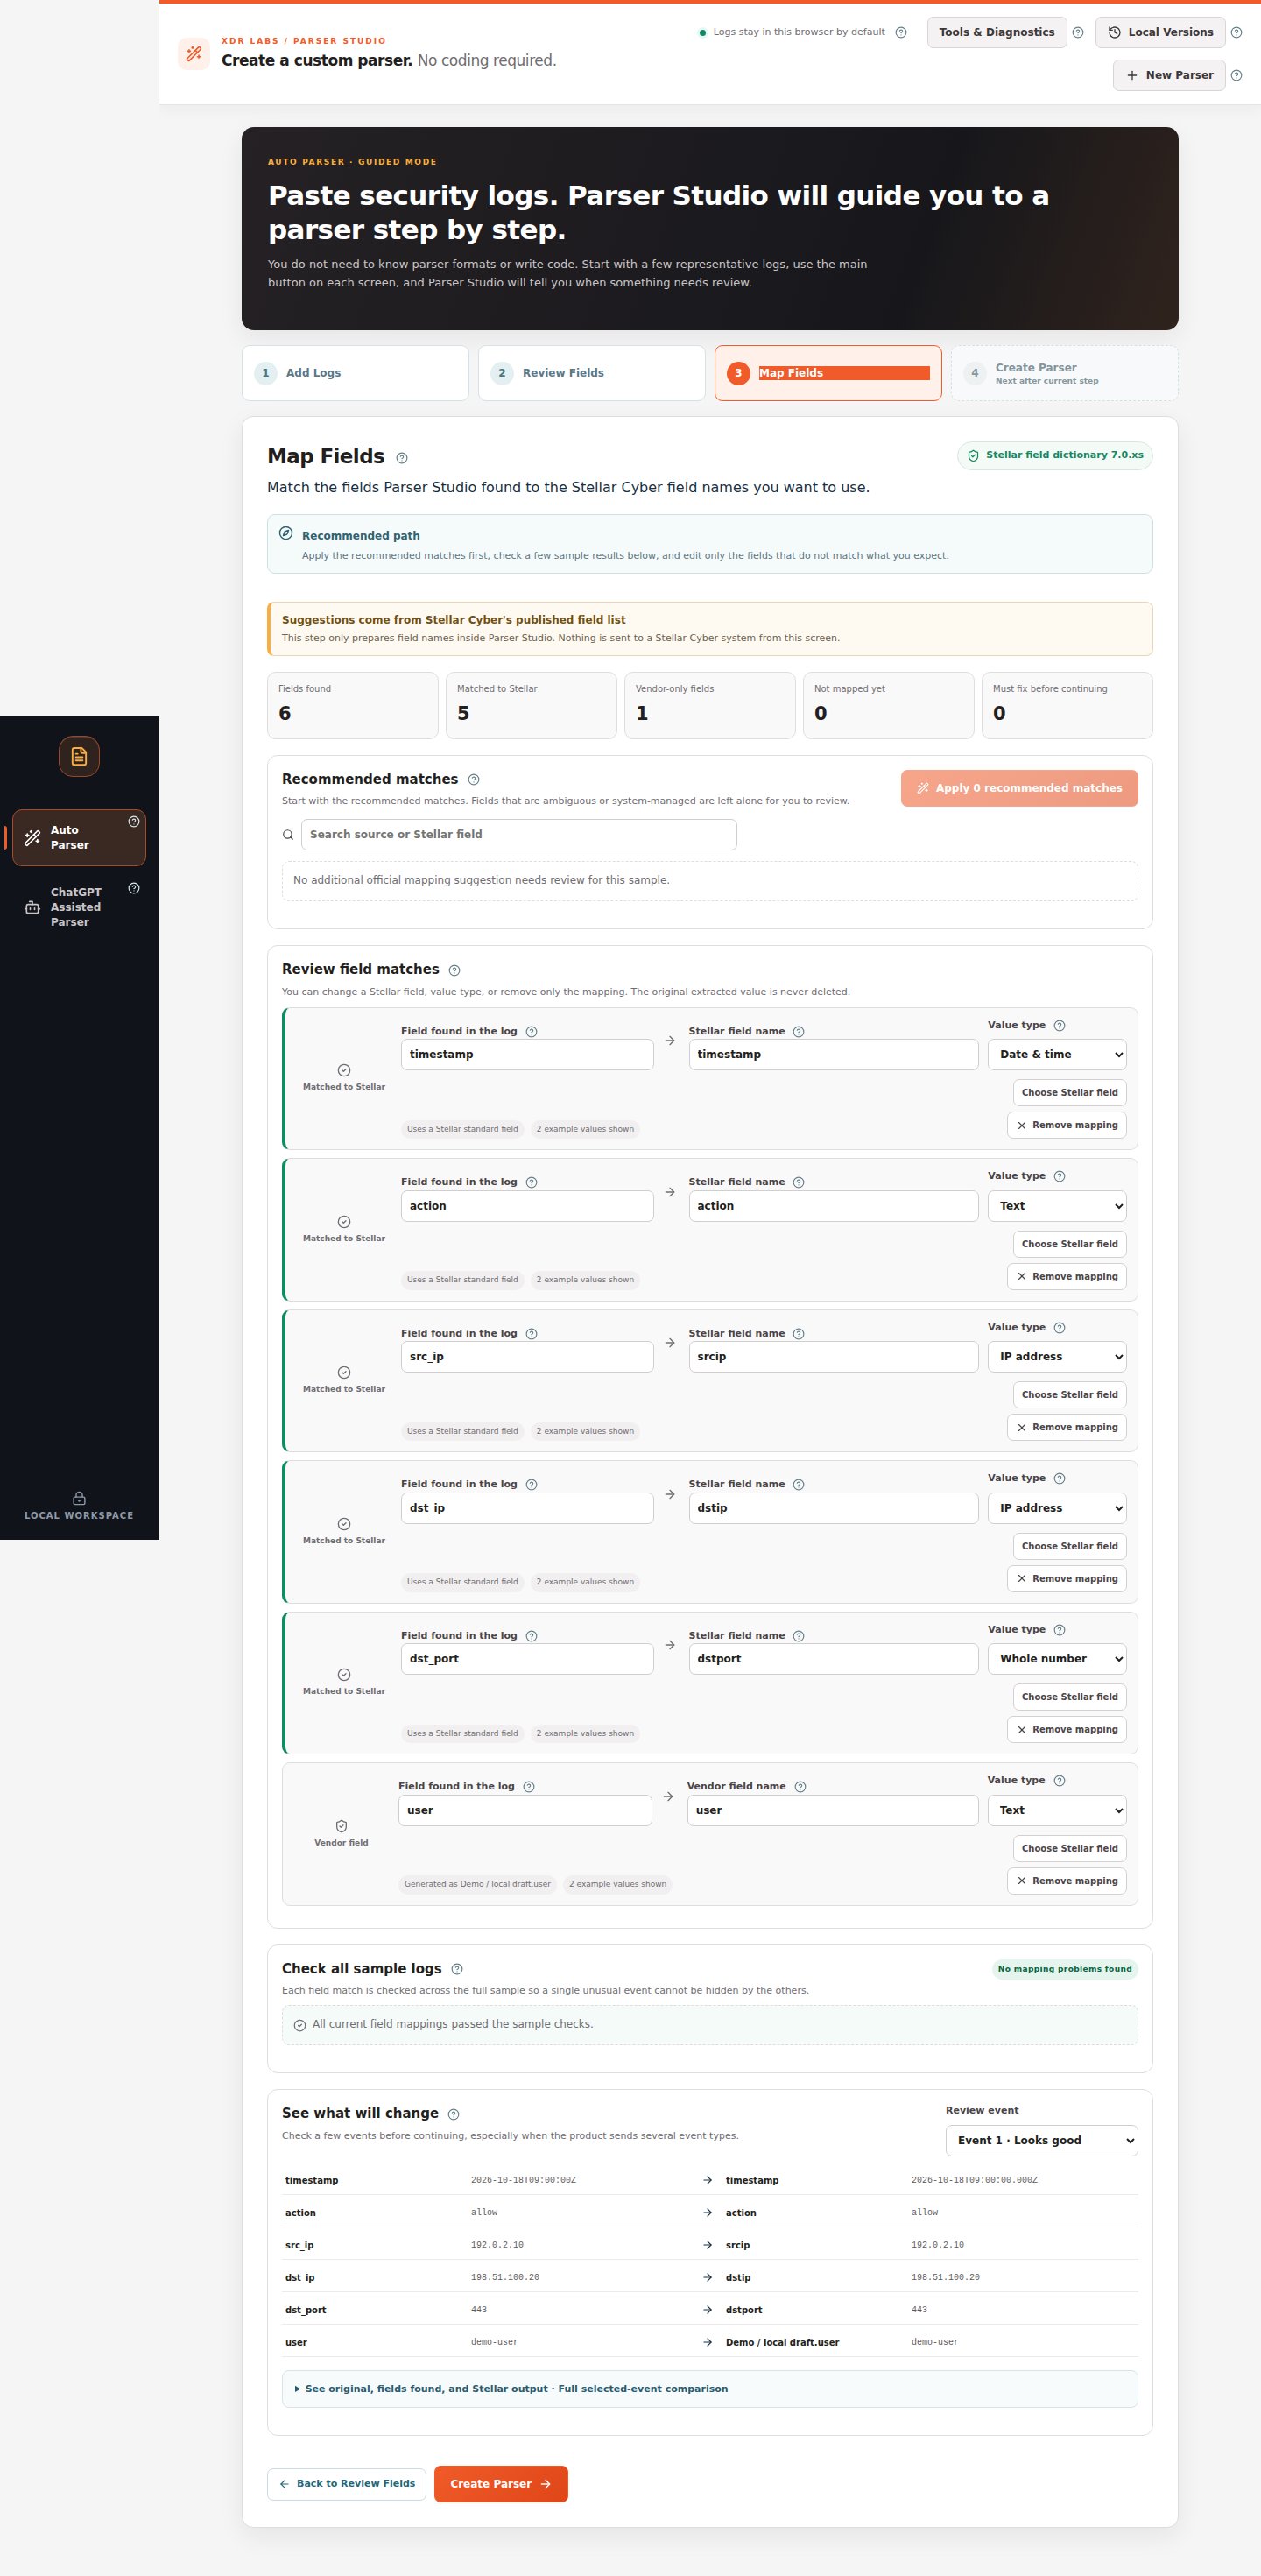 *The mapping review is where you verify field meanings. You do not need to edit a correct suggestion.*
## Step 5 — Run the final test and download
On the **Create Parser** screen:
1. Confirm that **Need fixing** is **0**.
2. Choose **Run Final Test & Create Files**.
3. When the file generator completes its checks, download the **Ruby parser logic** and the companion **CONF** file; use the package option if available.
4. Keep the files together with the sample and your reviewed mappings.
*The mapping review is where you verify field meanings. You do not need to edit a correct suggestion.*
## Step 5 — Run the final test and download
On the **Create Parser** screen:
1. Confirm that **Need fixing** is **0**.
2. Choose **Run Final Test & Create Files**.
3. When the file generator completes its checks, download the **Ruby parser logic** and the companion **CONF** file; use the package option if available.
4. Keep the files together with the sample and your reviewed mappings.
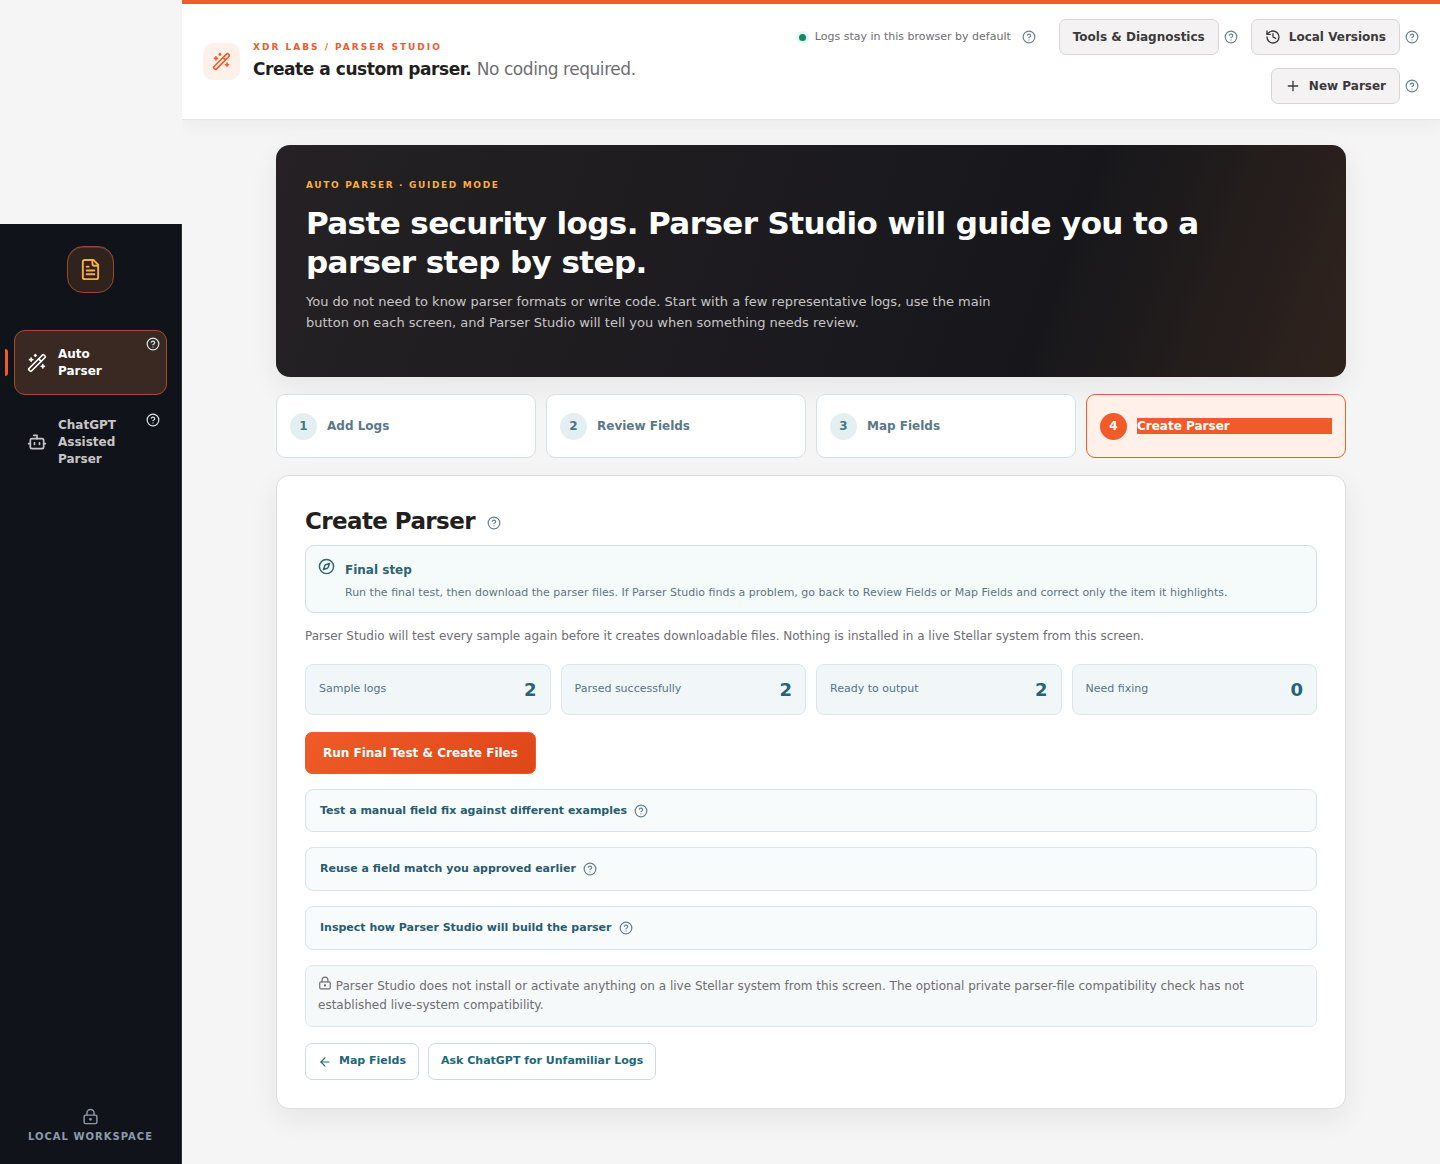 *This screenshot shows the final pre-generation screen, not a claim that a download has already succeeded. File controls appear only after the backend accepts the reviewed draft.*
If the final test is blocked, **do not skip the warning**. Return to Review Fields or Map Fields and correct the reason shown on screen. If the file-generation service is unavailable, the analysis result is still useful, but no files have been generated.
## Which guide comes next?
Find the incorrect event and use the suggested next action.
Learn how to review several event shapes without losing a log.
This documentation is built and hosted on [Mintlify](https://mintlify.com), a developer documentation platform.
*This screenshot shows the final pre-generation screen, not a claim that a download has already succeeded. File controls appear only after the backend accepts the reviewed draft.*
If the final test is blocked, **do not skip the warning**. Return to Review Fields or Map Fields and correct the reason shown on screen. If the file-generation service is unavailable, the analysis result is still useful, but no files have been generated.
## Which guide comes next?
Find the incorrect event and use the suggested next action.
Learn how to review several event shapes without losing a log.
This documentation is built and hosted on [Mintlify](https://mintlify.com), a developer documentation platform.